Apparently installing DotNetNuke is quite tricky. I did make a few mistakes which wasted a few minutes. So hopefully this post will save you from hassle.
- Get your Internet Information Server (IIS) up and running
- IIS is by default available on Windows 2000 all version, Windows XP Professional, Windows Server 2003. If you have Windows XP Home Edition, don’t worry. This hack should help to get IIS installed on Windows XP Home Edition. To confirm your installation click this HERE.
- Install .NET Framework 2.0
- Get your .NET Framework 2.0 HERE. The trick is always to get .NET Framework installed after your IIS confirmed up and running. You can’t do it the other way round. For most Windows XP installation, usually .NET Framework is already installed by default. If you happen to have such condition, you need to uninstall your .NET Framework, confirm that your IIS is up and running and then you proceed to install .NET Framework.
- Download DotNetNuke
- Although I recommended .NET Framework 2.0 at step 2, DotNetNuke older version is running on .NET Framework 1.1. So if you haven’t upgrade your .NET Framework to 2.0 and you don’t have intention to do so, download the DotNetNuke version 3.x. Otherwise, download version 4.x. The download page is HERE.
- Setup the Folder
- Extract the archive you download in Step 3. In this example we will assume the installation folder is C:DotNetNuke. Right-click on C:DotNetNuke folder, click Properties. On the General tab, make sure the Read-Only checkbox is not ticked. On the Security tab, add user “ASPNET” and give it Full Control access rights. You might want to add user “IUSER_YOURCOMPUTERNAME” (the IIS guest account) and give it non-Write access rights.
- Setup the Virtual Directory

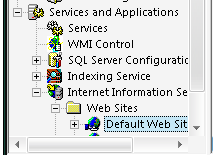
Open the IIS Management Console. You could do it by Start–Run-type “C:WindowsSystem32inetserviis.msc“-OK, or by Start–Run-type “compmgmt.msc“-OK continued by browsing to the IIS section. Right-click on the Default Web Site, New -> Virtual Directory. A wizard window will show up, click Next. Put DotNetNuke in the Alias text box, click Next. Browse to “C:DotNetNuke”, click Next. Tick Read and Run Scripts only, click Next. Click Finish.
- Install Database
- Although DotNetNuke supports not only MS SQL Database, I have yet to research them. In this opportunity, I will only discuss about MS SQL. Hopefully someday I will have time to test DotNetNuke installation with other type of Databases and report it there. Okay, first you need to download your copy of MS SQL Express Edition. You can downloaded it HERE.
- Setup Database

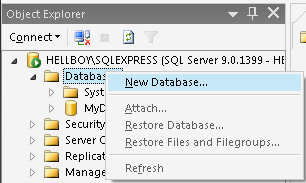
Open your SQL Server Management Studio (Start -> All Programs -> Microsof SQL Server 2005 -> SQL Server Management Studio). Click Connect. Above Database, Right-click -> New Database. Give the database a name, in this case we will name it MyDNN and click OK.
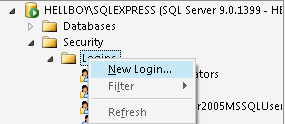
Go to Security -> Logins. Above Logins, Right-click -> New Login. Type the Login Name –we will call it myDNNuser and then change the radio-button into SQL Server Authentication, and then type the password and confirm it, and then select the Default Database (i.e. MyDNN), and finally click OK.
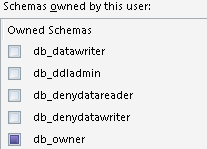
Go back to the MyDNN Database -> Security -> MyDNNuser -> Right-click -> Properties. Make sure db_owner on the “Schemas owned by this user is ticked”
- Edit Configuration File
- On the folder “C:DotNetNuke” you will find web.config, edit it. If you could not find web.config, rename release.config into web.config. Look for a tag called <connectionStrings>. Inside it, comment the first child tag and uncomment the second one. Make sure you put the correct value in that tag. (i.e. value=”Server=YOUR_ComputerNameSQLEXPRESS; Database=myDNN; uid=myDNNuser; pwd=the_password;”). Do the same on the other tag called <appSettings>
After this you need to point your browser to “http://localhost/DotNetNuke/Install/install.aspx”. The installation should be automatic. Problems? Critics? Suggestions? Just drop your opinion on the comments. 🙂


