Around three weeks ago, GoDaddy (where I was hosting this blog) suffered a downtime. Although they’re back online within 48 hours, something bad had happened to shared server that hosted my blog. I don’t really know the details, but I only know the outcome. This blog become super slow, intermittently spitted out timeout error, and frequently crashed (I need to terminate the web process from Hosting Control Panel). Being a good customer, I raised ticket and gave them chance to resolve this problem. But after two weeks with no improvement, my patience ran out. So I spent last week moving out this blog to Amazon EC2.
Why Amazon EC2? I can’t really elaborate why. But I can say that it’s a weird logic combination of:
- The Amazon brand
- I’ve seen many cool projects are hosted in Amazon EC2
- Free tier usage!!
- Learn something new 😀
Using few guides that I found on the Net, I managed to achieved the setup that I want. It wasn’t a smooth sailing though. In the end, I learned something new and now I write this guide hopefully will get you on a smooth sailing migrating your WordPress blog from GoDaddy to Amazon EC2.
Alright, let’s get dirty!!
After you login to your Amazon Web Service account, you’ll have something like below. Click EC2.

Now on your left screen you’ll have something like this:
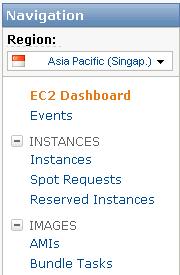
You might need to change the location of your data center. For me, I changed it to Asia Pacific (Singapore) because majority of my blog readers come from this region.
Next, click Instance.

Then, click Launch Instance button. You will be prompted with 3 choices:
- Classic Wizard: You will be required to configure in details your EC2 instance.
- Quick Launch Wizard: You can choose from a number of commonly used OS + Software setup.
- AWS Marketplace: You’ll have myriads of setups available to choose. These setups already come with the prepackaged software.
For now, let’s just select Quick Launch Wizard and pick Ubuntu Server 11.10.

Before we can continue, we need to give name to our instance. We also need to create a new Key Pair and download the Key Pair. We are going to need Key Pair to establish SSH connection later on.

When you clicked the download button, you’ll receive a [Name].pem. In my example, it’s wpkey.pem. What to do now is to click the Continue button. After that, we will have the summary screen detailing our setup.
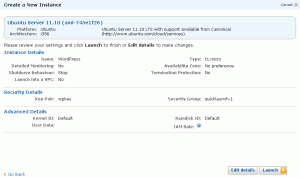
Next, click Launch button to have our instance running.
Assign IP Address
By default, our instance will only have internal IP. To make the instance have an external IP. We need to use Elastic IP. On the EC2 Navigation Panel, click Elastic IPs:
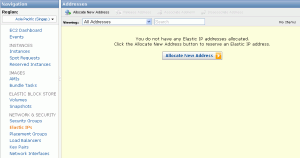
Click Allocate New Address button
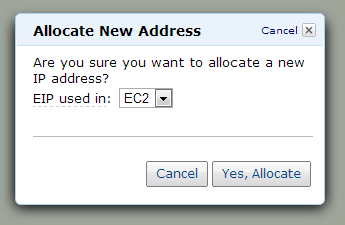
Click Yes, Allocate. After a while, we will see the new IP Address in the table. Select the row, then click Associate Address button.
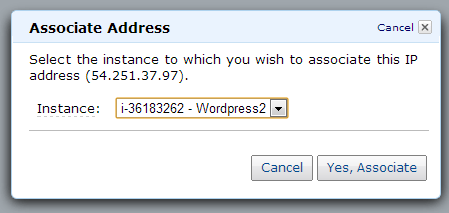
That’s it for now. Let’s continue to the next topic about establishing SSH Connection.
There are many tools that enables you to have SSH session with your EC2 instance. But I won’t review them all here, I’ll just discuss my choice of tools. Which are:
- PuttyGen: This tool is used to generate private key from previously downloaded Key-Pair file (e.g. wpkey.pem)
- Putty: This tool is used to establish SSH connection.
- FileZilla: This tool is an FTP client that capable connecting to SFTP protocol
Putty and PuttyGen can be downloaded HERE. Filezilla’s download page is HERE.
Generate Private Key
Run PuttyGen:

Click Load button, select the .pem file.

Change the Number of bits in a generated key to 2048. Click the Save private key button and name the file wpkey.ppk
Establish SSH Connection
Run Putty:

Go to Connection -> SSH -> Auth. We need to set the Private key for authentication with the .ppk file that we generate before. Click browse, and find the file. After that go to Session

Set the Hostname (or IP address) with the IP address obtained in previous page. Or you could use the Public DNS value shown in your Instance detail. Leave the default value (22) for Port. Under the Saved Session, give name to this connection (e.g. ec2), then click Save. Finally, click Open to initiate connection.
Putty will prompted you whether this connection can be trusted:

Click Yes. To login, use ubuntu as username.

Congratulations! You are now connected to your Ubuntu server through SSH.
Establish SFTP Connection
Run FileZilla, go to Edit -> Settings. In the Settings window, go to Connection -> SFTP. Press Add keyfile button. Select the same .ppk file as the one used by Putty.

Next, go to Sites Manager. Add connection to your instance by following configuration similar to below and save it for future usage.

Alright, so far so good. We now can connect to our instance and transfer files. Next, let’s start configuring our server for WordPress.
To install MySQL, run the following command:
sudo -i
apt-get update
apt-get install mysql-server
MySQL will prompt you to enter the root password. Write it down, or save the password somewhere in case you forget.
Once the installation completed, login to MySQL
mysql -u root -p
You’ll be prompted for password. Use the same password as you set in installation step.
At the mysql> prompt, run these commands, replacing NEW_PASSWORD with a password of your own
CREATE DATABASE wordpress;
GRANT ALL PRIVILEGES ON wordpress.*
TO "wp_user"@"localhost" IDENTIFIED BY "NEW_PASSWORD";
FLUSH PRIVILEGES;
EXIT
Now let’s create a custom configuration file to cater the RAM size limitation in EC2 Micro.
vim /etc/mysql/conf.d/ec2.cnf
Press i to make Vim enter edit mode. Paste below code by mouse right-click
[mysqld]
key_buffer = 12M
query_cache_size = 0
table_cache = 32

ignore_builtin_innodb
default_storage_engine=MyISAM
Press Esc key to return to read mode. Press !wq to save the file.
Alright, that’s all for MySQL portion.
Run the following commands to install PHP FPM:
apt-get install php5-fpm php5-cli php-apc php5-suhosin php5-curl php5-gd php5-intl php5-mcrypt php-gettext php5-mysql php5-sqlite
After the installation completed, we’re going to customize it. But first, let’s backup the config files.
mkdir /root/backup
mkdir /root/backup/etc
mkdir /root/backup/etc/php5
mkdir /root/backup/etc/php5/conf.d
mkdir /root/backup/etc/php5/fpm
mkdir /root/backup/etc/php5/fpm/pool.d
cp /etc/php5/conf.d/apc.ini /root/backup/etc/php5/conf.d
cp /etc/php5/fpm/php.ini /root/backup/etc/php5/fpm
cp /etc/php5/fpm/pool.d/www.conf /root/backup/etc/php5/fpm/pool.d
Now let’s modify /etc/php5/conf.d/apc.ini. Replace its content with:
[APC]
extension=apc.so
apc.enabled=1
apc.shm_segments=1
apc.shm_size=16
apc.ttl=7200
apc.user_ttl=7200
apc.num_files_hint=1024
apc.mmap_file_mask=/tmp/apc.XXXXXX
apc.max_file_size = 1M
apc.post_max_size = 1000M
apc.upload_max_filesize = 1000M
apc.enable_cli=0
apc.rfc1867=0
Next, let’s modify /etc/php5/fpm/php.ini. Append the following text:
[apc]
apc.write_lock = 1
apc.slam_defense = 0
Lastly, let’s modify /etc/php5/fpm/pool.d/www.conf. Match the content with below configuration:
user = nginx
group = nginx
listen = /dev/shm/php-fpm-www.sock
listen.owner = nginx
listen.group = nginx
listen.mode = 0666
Let’s now restart the service
service php5-fpm restart
To install Nginx, we will follow the installation guide found HERE.
First, we will download the Nginx signing key and add it to the apt program keyring
cd /tmp
wget http://nginx.org/keys/nginx_signing.key
apt-key add nginx_signing.key
Now we’re ready to install Nginx
deb http://nginx.org/packages/ubuntu/ oneiric nginx
deb-src http://nginx.org/packages/ubuntu/ oneiric nginx
apt-get update
apt-get install nginx
Next, let’s configure Nginx. But first, as usual, let’s backup the configuration files first.
mkdir /root/backup/etc/nginx
cp /etc/nginx/nginx.conf /root/backup/etc/nginx
cp /etc/nginx/php.conf /root/backup/etc/nginx
Replace the content of /etc/nginx/nginx.conf with:
user nginx;
worker_processes 1;
pid /var/run/nginx.pid;

events {
	worker_connections 1024;
	# multi_accept on;
}

http {

	##
	# Basic Settings
	##

	sendfile on;
	tcp_nopush on;
	tcp_nodelay on;
	keepalive_timeout 65;
	types_hash_max_size 2048;
	# server_tokens off;

	# server_names_hash_bucket_size 64;
	# server_name_in_redirect off;

	include /etc/nginx/mime.types;
	default_type application/octet-stream;

	##
	# Logging Settings
	##

	access_log /var/log/nginx/access.log;
	error_log /var/log/nginx/error.log;

	##
	# Gzip Settings
	##

	gzip on;
	gzip_disable "msie6";

	# gzip_vary on;
	# gzip_proxied any;
	# gzip_comp_level 6;
	# gzip_buffers 16 8k;
	# gzip_http_version 1.1;
	# gzip_types text/plain text/css application/json application/x-javascript text/xml application/xml application/xml+rss text/javascript;

	##
	# nginx-naxsi config
	##
	# Uncomment it if you installed nginx-naxsi
	##

	#include /etc/nginx/naxsi_core.rules;

	##
	# nginx-passenger config
	##
	# Uncomment it if you installed nginx-passenger
	##

	#passenger_root /usr;
	#passenger_ruby /usr/bin/ruby;

	##
	# Virtual Host Configs
	##

	include /etc/nginx/conf.d/*.conf;
	include /etc/nginx/sites-enabled/*;

	port_in_redirect off;
}
Replace the content of /etc/nginx/php.conf with:
# Route all requests for non-existent files to index.php
location / {
	try_files $uri $uri/ /index.php$is_args$args;
}

# Pass PHP scripts to php-fastcgi listening on port 9000
location ~ \.php$ {

	# Zero-day exploit defense.
	# http://forum.nginx.org/read.php?2,88845,page=3
	# Won't work properly (404 error) if the file is not stored on
	# this server,  which is entirely possible with php-fpm/php-fcgi.
	# Comment the 'try_files' line out if you set up php-fpm/php-fcgi
	# on another machine.  And then cross your fingers that you won't get hacked.
	try_files $uri =404;

	include fastcgi_params;

	# Keep these parameters for compatibility with old PHP scripts using them.
	fastcgi_param PATH_INFO $fastcgi_path_info;
	fastcgi_param PATH_TRANSLATED $document_root$fastcgi_path_info;
	fastcgi_param SCRIPT_FILENAME $document_root$fastcgi_script_name;

	# Some default config
	fastcgi_connect_timeout        20;
	fastcgi_send_timeout          180;
	fastcgi_read_timeout          180;
	fastcgi_buffer_size          128k;
	fastcgi_buffers            4 256k;
	fastcgi_busy_buffers_size    256k;
	fastcgi_temp_file_write_size 256k;
	fastcgi_intercept_errors    on;
	fastcgi_ignore_client_abort off;
	fastcgi_pass unix:/dev/shm/php-fpm-www.sock;

}
# PHP search for file Exploit:
# The PHP regex location block fires instead of the try_files block. Therefore we need
# to add "try_files $uri =404;" to make sure that "/uploads/virusimage.jpg/hello.php"
# never executes the hidden php code inside virusimage.jpg because it can't find hello.php!
# The exploit also can be stopped by adding "cgi.fix_pathinfo = 0" in your php.ini file.
Now, let’s create a specific configuration file for our site (e.g. /etc/nginx/available-sites/mysite.conf). You need to change every word sodeve.net found below into the name of your blog URL.
server {
	listen 80;
	server_name www.sodeve.net sodeve.net;
	root /var/www/sodeve.net/public;
	index index.html index.htm index.php;

	access_log  /var/www/sodeve.net/access.log;
	error_log  /var/www/sodeve.net/error.log;

	# Directives to send expires headers and turn off 404 error logging.
	location ~* \.(js|css|png|jpg|jpeg|gif|ico)$ {
		expires max;
		log_not_found off;
		access_log off;
	}

	location = /favicon.ico {
		log_not_found off;
		access_log off;
	}

	location = /robots.txt {
		allow all;
		log_not_found off;
		access_log off;
	}

	## Disable viewing .htaccess & .htpassword
	location ~ /\. { deny  all; access_log off; log_not_found off; }

	include /etc/nginx/php.conf;
	#Download
	#rewrite ^/downloadz/(.*)$ /wp-content/plugins/download-monitor/download.php?id=$1 last;

	# BEGIN W3TC Minify cache
location ~ /wp-content/w3tc/min.*\.js$ {
    types {}
    default_type application/x-javascript;
    expires modified 31536000s;
    add_header X-Powered-By "W3 Total Cache/0.9.2.4";
    add_header Vary "Accept-Encoding";
    add_header Pragma "public";
    add_header Cache-Control "max-age=31536000, public, must-revalidate, proxy-revalidate";
}
location ~ /wp-content/w3tc/min.*\.css$ {
    types {}
    default_type text/css;
    expires modified 31536000s;
    add_header X-Powered-By "W3 Total Cache/0.9.2.4";
    add_header Vary "Accept-Encoding";
    add_header Pragma "public";
    add_header Cache-Control "max-age=31536000, public, must-revalidate, proxy-revalidate";
}
location ~ /wp-content/w3tc/min.*js\.gzip$ {
    gzip off;
    types {}
    default_type application/x-javascript;
    expires modified 31536000s;
    add_header X-Powered-By "W3 Total Cache/0.9.2.4";
    add_header Vary "Accept-Encoding";
    add_header Pragma "public";
    add_header Cache-Control "max-age=31536000, public, must-revalidate, proxy-revalidate";
    add_header Content-Encoding gzip;
}
location ~ /wp-content/w3tc/min.*css\.gzip$ {
    gzip off;
    types {}
    default_type text/css;
    expires modified 31536000s;
    add_header X-Powered-By "W3 Total Cache/0.9.2.4";
    add_header Vary "Accept-Encoding";
    add_header Pragma "public";
    add_header Cache-Control "max-age=31536000, public, must-revalidate, proxy-revalidate";
    add_header Content-Encoding gzip;
}
# END W3TC Minify cache
	# BEGIN W3TC Page Cache cache
location ~ /wp-content/w3tc/pgcache.*html$ {
    expires modified 3600s;
    add_header X-Powered-By "W3 Total Cache/0.9.2.4";
    add_header Vary "Accept-Encoding, Cookie";
    add_header Pragma "public";
    add_header Cache-Control "max-age=3600, public, must-revalidate, proxy-revalidate";
}
location ~ /wp-content/w3tc/pgcache.*gzip$ {
    gzip off;
    types {}
    default_type text/html;
    expires modified 3600s;
    add_header X-Powered-By "W3 Total Cache/0.9.2.4";
    add_header Vary "Accept-Encoding, Cookie";
    add_header Pragma "public";
    add_header Cache-Control "max-age=3600, public, must-revalidate, proxy-revalidate";
    add_header Content-Encoding gzip;
}
# END W3TC Page Cache cache
	# BEGIN W3TC Browser Cache
gzip on;
gzip_types text/css application/x-javascript text/x-component text/richtext image/svg+xml text/plain text/xsd text/xsl text/xml image/x-icon;
location ~ \.(css|js|htc)$ {
    expires 31536000s;
    add_header Pragma "public";
    add_header Cache-Control "max-age=31536000, public, must-revalidate, proxy-revalidate";
    add_header X-Powered-By "W3 Total Cache/0.9.2.4";
}
location ~ \.(html|htm|rtf|rtx|svg|svgz|txt|xsd|xsl|xml)$ {
    expires 3600s;
    add_header Pragma "public";
    add_header Cache-Control "max-age=3600, public, must-revalidate, proxy-revalidate";
    add_header X-Powered-By "W3 Total Cache/0.9.2.4";
}
location ~ \.(asf|asx|wax|wmv|wmx|avi|bmp|class|divx|doc|docx|eot|exe|gif|gz|gzip|ico|jpg|jpeg|jpe|mdb|mid|midi|mov|qt|mp3|m4a|mp4|m4v|mpeg|mpg|mpe|mpp|otf|odb|odc|odf|odg|odp|ods|odt|ogg|pdf|png|pot|pps|ppt|pptx|ra|ram|svg|svgz|swf|tar|tif|tiff|ttf|ttc|wav|wma|wri|xla|xls|xlsx|xlt|xlw|zip)$ {
    expires 31536000s;
    add_header Pragma "public";
    add_header Cache-Control "max-age=31536000, public, must-revalidate, proxy-revalidate";
    add_header X-Powered-By "W3 Total Cache/0.9.2.4";
}
# END W3TC Browser Cache
	# BEGIN W3TC Minify core
rewrite ^/wp-content/w3tc/min/w3tc_rewrite_test$ /wp-content/w3tc/min/index.php?w3tc_rewrite_test=1 last;
set $w3tc_enc "";
if ($http_accept_encoding ~ gzip) {
    set $w3tc_enc .gzip;
}
if (-f $request_filename$w3tc_enc) {
    rewrite (.*) $1$w3tc_enc break;
}
rewrite ^/wp-content/w3tc/min/(.+\.(css|js))$ /wp-content/w3tc/min/index.php?file=$1 last;
# END W3TC Minify core
	# BEGIN W3TC Page Cache core
rewrite ^(.*\/)?w3tc_rewrite_test$ $1?w3tc_rewrite_test=1 last;
set $w3tc_rewrite 1;
if ($request_method = POST) {
    set $w3tc_rewrite 0;
}
if ($query_string != "") {
    set $w3tc_rewrite 0;
}
if ($http_host != "sodeve.net") {
    set $w3tc_rewrite 0;
}
set $w3tc_rewrite2 1;
if ($request_uri !~ \/$) {
    set $w3tc_rewrite2 0;
}
if ($request_uri ~* "(sitemap(_index)?\.xml(\.gz)?|[a-z0-9_\-]+-sitemap([0-9]+)?\.xml(\.gz)?)") {
    set $w3tc_rewrite2 1;
}
if ($w3tc_rewrite2 != 1) {
    set $w3tc_rewrite 0;
}
set $w3tc_rewrite3 1;
if ($request_uri ~* "(\/wp-admin\/|\/xmlrpc.php|\/wp-(app|cron|login|register|mail)\.php|wp-.*\.php|index\.php|download.php|securimage.php)") {
    set $w3tc_rewrite3 0;
}
if ($request_uri ~* "(wp\-comments\-popup\.php|wp\-links\-opml\.php|wp\-locations\.php)") {
    set $w3tc_rewrite3 1;
}
if ($w3tc_rewrite3 != 1) {
    set $w3tc_rewrite 0;
}
if ($http_cookie ~* "(comment_author|wp\-postpass|wordpress_\[a\-f0\-9\]\+|wordpress_logged_in)") {
    set $w3tc_rewrite 0;
}
if ($http_user_agent ~* "(W3\ Total\ Cache/0\.9\.2\.4)") {
    set $w3tc_rewrite 0;
}
set $w3tc_ua "";
set $w3tc_ref "";
set $w3tc_ssl "";
set $w3tc_enc "";
if ($http_accept_encoding ~ gzip) {
    set $w3tc_enc _gzip;
}
set $w3tc_ext "";
if (-f "$document_root/wp-content/w3tc/pgcache/$request_uri/_index$w3tc_ua$w3tc_ref$w3tc_ssl.html$w3tc_enc") {
    set $w3tc_ext .html;
}
if (-f "$document_root/wp-content/w3tc/pgcache/$request_uri/_index$w3tc_ua$w3tc_ref$w3tc_ssl.xml$w3tc_enc") {
    set $w3tc_ext .xml;
}
if ($w3tc_ext = "") {
  set $w3tc_rewrite 0;
}
if ($w3tc_rewrite = 1) {
    rewrite .* "/wp-content/w3tc/pgcache/$request_uri/_index$w3tc_ua$w3tc_ref$w3tc_ssl$w3tc_ext$w3tc_enc" last;
}
# END W3TC Page Cache core
	# BEGIN W3TC Skip 404 error handling by WordPress for static files
if (-f $request_filename) {
    break;
}
if (-d $request_filename) {
    break;
}
if ($request_uri ~ "(robots\.txt|sitemap(_index)?\.xml(\.gz)?|[a-z0-9_\-]+-sitemap([0-9]+)?\.xml(\.gz)?)") {
    break;
}
if ($request_uri ~* \.(css|js|htc|html|htm|rtf|rtx|svg|svgz|txt|xsd|xsl|xml|asf|asx|wax|wmv|wmx|avi|bmp|class|divx|doc|docx|eot|exe|gif|gz|gzip|ico|jpg|jpeg|jpe|mdb|mid|midi|mov|qt|mp3|m4a|mp4|m4v|mpeg|mpg|mpe|mpp|otf|odb|odc|odf|odg|odp|ods|odt|ogg|pdf|png|pot|pps|ppt|pptx|ra|ram|svg|svgz|swf|tar|tif|tiff|ttf|ttc|wav|wma|wri|xla|xls|xlsx|xlt|xlw|zip)$) {
    return 404;
}
# END W3TC Skip 404 error handling by WordPress for static files
}
Alright, we’re almost done. What’s left now is just migrating our existing existing WordPress files from GoDaddy to our new EC2 instance.
To migrate WordPress, we basically need to do two things:
- Migrate MySQL Database
- Migrate WordPress files
- Change DNS Record
Migrate MySQL Database
First, let’s backup the DB. The easiest way to do this is using WP-DB Manager. Install this extension first if you don’t have it.

Once you backup it, use FileZilla to retrive the backup file. Because we are going to import the .sql file to database we created in step 4, it important to add this at the beginning of the file:
use wordpress;
Save the .sql file and then transfer it to our EC2 instance (put it in /tmp/ folder).
Now, in Putty, let’s import the backup file into MySQL.
mysql -u wp_user -p < /tmp/1348812291_-_wordpress.sql
Migrate WordPress files
First let’s create the directory to store the WordPress files
mkdir /var/www
mkdir /var/www/sodeve.net/
mkdir /var/www/sodeve.net/public
chown nginx:nginx /var/www/sodeve.net/public
Now we can copy all files from the old WordPress site at GoDaddy’s into our EC2 instance

Change DNS Record
To host our DNS we need to move our NameServers address to CloudFlare’s NameServers. First, login to your GoDaddy Domain Control Panel.

Click Set Nameservers and change the name servers to:
- DAVE.NS.CLOUDFLARE.COM
- PAM.NS.CLOUDFLARE.COM
Setting up DNS in CloudFlare is really simple so I’ll give it a pass. 😀
Alright, that’s basically all you need to do to migrate your blog from GoDaddy’s shared host to Amazon EC2.
I hope it helps. If you encountered problem following this example, please drop a comment or two below.
Cheers!


